Baking Jellyhearts (no bake jelly hearts recipe)
**long overdue post**
found a half written entry in my phone so decided to finish it up and post it!
//
Every time I mention i’m “baking” jelly hearts, I’m actually in a dilemma because no actual baking is required. Lol. but its considering a baking project, no?
i recently have been making a lot of jelly hearts, and almost on a weekly basis when I invite friends over to the new abode for a party – have drinks and wine, chill, make merry and enjoy each other’s company. or maybe you can call it housewarming but each time, I invite only a specific group of friends or family. the house is actually not ready, but everyone has been dying to see it and asking us for it.. so.. errmm.. we are doing it slowly.
I started with it my colleagues because I switched team recently and it was sorta a ‘farewell’ party for myself (tho no one thought of it that way I’m sure, but I wanted to get together with all of them), and that some of them were leaving for long trips and I made jelly hearts for the occasion! mainly because my team loves it and my now ex-boss loves it but she wasn’t able to make it though. anyhow, it was a success and everyone loved it.
and the husband didn’t quite believe that his wife could bake. that brings me to the story of our oven which my husband almost didn’t want to let me buy because he thinks wife can’t bake but that’s another story for another time (please remind me to tell it some day!!).
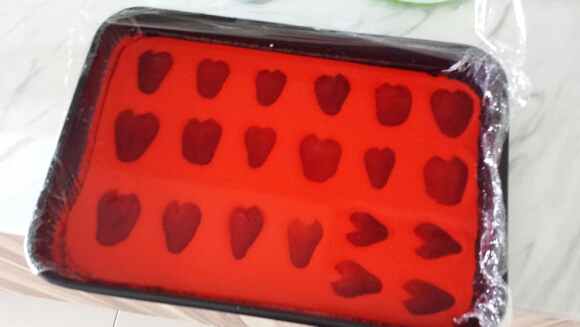
back to the jelly hearts. I made it over 3 days! quite a lot of effort considering that I made a trip to the new abode everyday to finish up each layer. I totally forgot to take a picture of the finished product when served on the table (too busy serving guests).

here’s just before I took it out of the pan.
I’ll share the recipe at the bottom of the blog entry if you are keen but here’s what I did over the 3 days.
Day 1
Prep the base of the jelly hearts. I tried crushing the biscuits with my spoon but realised that the biscuits are scratching my wmf cutlery instead (Wtf!) so I quickly stopped and threw them all into my avent baby food processor to blend. nifty tool, this one. I use it for other things other than baby food. Lol. I know some you are screaming about the oil from the biscuits contaminating the processor but I’m totally cool with it. it hadn’t even crossed my mind!

I also melted butter using the microwave for the base. mix the 2 together and you’ll get the base.

easy peasy!
note: if you see carefully, I used vinyl wrap for the base of the pan, but actually you should use baking paper. I didn’t have and couldn’t find at the point when I was looking for some so I made do.
Day 2
I made the cheese layer on this day. I had to wait a couple of hours for the cream cheese to soften but I didn’t have an electric whisk in the house and had to hand whisk the cream cheese. man, hard work! amazing to watch the cream cheese change with the addition of sugar. I feel like I was in a chemist class. heh heh.


I think it was my first time playing with gelatine too (or that I can remember)

poking holes in the hardened base.

pouring in the cream cheese which has since become like milkshake consistency, waited a while for it to set before putting the strawberries.
I ended the day with a blister in my thumb without me even realising it till I was washing up, and kinda made me feel like getting a kitchen aid. BUT, I think it will be a white elephant so I shall just only think. besides, I don’t really have much kitchen storage space left. so fast right?
Day 3
easiest! just make jello and pour on to the cake and put into fridge to set!

easy enough for me to repeat it every other weekend I think. and here’s the ingredients list!
for the crust:
300g digestive biscuits
150g melted butter
for the cheesecake layer:
500g of cream cheese (placed in room temperature for 2-3 hrs to soften)
1 & 1/2 tablespoons of gelatin powder
1 & 1/4 cups of boiling water
2/3 cups sugar
1 teaspoon vanilla extract
about 10-12 strawberries
for the jelly layer:
160g strawberry flavoured jelly
1 & 1/2 cups boiling water
notes: I only actually slightly less than 1/2 a cup of sugar and it still works and taste good. also, I followed the jelly instructions on the box that I got rather than the instructions I saw.
so, you got the ingredients, what about the detailed preparation and cooking instruction? you can find out more here where I first saw the jelly hearts recipe – http://munchministry.com/recipe/strawberry-jelly-hearts-cheesecake/
so yup! easy and pretty dessert to make to serve guests, but its time consuming and definitely need to prep in advance if you are having a party or expecting guests!
p.s. you could also shorten the process to at least 4 hours of setting between each layer but I find that it taste way better and more stable with longer time left between the layers.
do let me know how it works for you if you try it!
Posted via LiveJournal app for Android.
3 Comments
Anonymous
looks super yummy. I WANT SOME!
Mabel
http://amazinglystill.com
Anonymous
looks super yummy. I WANT SOME!
Mabel
http://amazinglystill.com
Anonymous
looks super yummy. I WANT SOME!
Mabel
http://amazinglystill.com